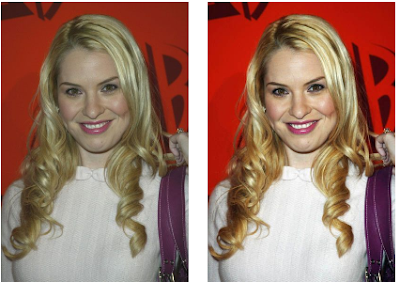
Guide to Color Correcting Blonde Hair Color Problem
One of my pet peeves is green casts in blonde hair. It looks awful--like a
hair color disaster! Unfortunately many digital cameras have a problem with
blonde hair in low lighting and this issue is fairly common even with high-end
cameras. Fortunately, however, it is actually pretty easy to fix this problem.
At first glance when you see what looks like a green tint in the blonde, you
might tend to think you have to adjust the green levels. But the problem is
with a lack of red. So instead of changing magenta's, you can make it look right
with an adjustment to Cyan in the Yellows.
Even after the hair color is improved, the picture still looks flat. It
needs more brightness and contrast.
After Brightness +25 and Contrast + 35.
That's not bad, but Leslie Grossman's white sweater still looks dull. Let's
try Auto Levels and see what happens.
That punched up the brightness and contrast nicely. And now it looks more
like the picture could have been taken outside in the sun instead of inside
with poor lighting.
Speaking of highlights, the Photoshop user needs to pay special attention to
the brightest and darkest parts of an image during the correction process. When
an image is brightened up with Brightness or Levels, for example, as it was in
the above example, it may "blow out" the highlights and compromise
the integrity of the image through loss of detail, because the brightness of all
parts of the image is often increased with adjustment layers, not just the
parts that need it.
One trick to brighten a photo but not blow out the highlights is to adjust
the lowest fields (Output Levels) in the dialog box for Levels at the end or
near the end of the correction process. An adjustment of only 5 may suffice and
be the final difference between an amateur and professional look.
Always pay special attention to portraits where the subject has blonde hair.
Blondes, of course, are most likely to have white or virtually white
"highlights." (With brunettes there is rarely the same problem; with
them the issue is parts of hair being too dark.) But you still need to pay
attention to teeth and whites of eyes when cranking up brightness even if the
hair is perfect.
In cases where adjustments to an entire photo are too harsh, you may have to
isolate parts of the image with the Lasso tool, feather it by 1-10 (or more),
for a natural color/tonal transition, and then add the adjustment layer only to
that section. With experience you're learn when you need to isolate part of the
pic, and when it's not necessary.


No comments:
Post a Comment